AWS EKS: Running Your First Workload Using AWS CDK
Created an EKS cluster and deployed a workload using AWS CDK
Separated stack between infrastructure and application
Defined Kubernetes resources (ConfigMap, Deployment, Service) in code
Learned why
cdk deploy --allis often required to apply updates
Now that we have a running EKS cluster created with AWS CDK, it’s time to deploy our first workload. In this post, we’ll define Kubernetes resources using AWS CDK, deploy a simple web workload to the cluster, and expose it so it can be accessed externally.
This will give us a practical foundation before moving on to ingress, scaling, and Karpenter in later posts.
By default, Kubernetes workloads are defined using YAML manifests and applied manually using kubectl. While this approach works, it often leads to duplicated configuration, limited reusability, and infrastructure logic being scattered across multiple files.
With AWS CDK, we can define Kubernetes resources directly in code and let CDK handle applying them to the cluster. Under the hood, CDK still talks to the Kubernetes API, but we gain the benefits of using a real programming language—such as structure, composition, and version control.
BTW, our project structure should be like this one:
running-first-workloads/├── app.py├── cdk.json├── requirements.txt├── eks│ ├── __init__.py│ └── eks_stack.py # 1. Create EKS cluster├── workloads│ ├── __init__.py│ └── running_first_workloads_stack.py # 2. Running workload└── testseks/eks_stack.py
Defines the core EKS infrastructure, including the VPC, EKS control plane, managed node group, and IAM access configuration. This stack is responsible only for the cluster itself.
workloads/running_first_workloads_stack.py
Defines Kubernetes resources that run on top of the existing cluster. In this post, this includes the ConfigMap, Deployment, and Service for the Caddy web server.
app.py
Acts as the entry point that wires the two stacks together. The EKS cluster created in eks_stack.py is passed into the workload stack, allowing workloads to be deployed without recreating the cluster.
Now let’s do some work and start defining our first Kubernetes workload using AWS CDK inside running_first_workloads_stack.py.
We start by defining a new CDK stack class that accepts an existing EKS cluster as a parameter.
class RunningFirstWorkloadsStack(Stack):
def __init__( self, scope: Construct, construct_id: str, cluster: eks.Cluster, **kwargs ) -> None: super().__init__(scope, construct_id, **kwargs)Unlike the cluster stack, this stack does not create any AWS infrastructure. Instead, it receives a reference to an already running EKS cluster. This reference allows CDK to know where Kubernetes resources should be applied.
For our first workload, we’ll deploy Caddy, a lightweight and modern web server. Caddy is a good fit for this example because it behaves like a real-world application component while remaining simple enough to focus on Kubernetes and CDK concepts rather than application logic.
A ConfigMap to store the Caddy configuration
A Deployment to run the Caddy containers
A Service to expose the application externally

Image Source: Caddy Community
All of these resources are defined using cluster.add_manifest() in the workload stack. CDK takes care of applying the manifests to the cluster in the correct order, allowing us to focus on how the workload is structured rather than how it is manually deployed.
Next, we’ll start by defining a ConfigMap to store the Caddy configuration.
Before running any containers, we need to define how Caddy should behave. Instead of embedding configuration directly into the container image, we store the configuration in a ConfigMap. This is a common Kubernetes pattern that keeps application configuration separate from the runtime environment.
For this example, the configuration is intentionally minimal. We configure Caddy to listen on port 80 and return a simple HTTP response. This keeps the focus on how the workload is deployed, not on application logic. This ConfigMap will create an object named caddy-config that contains a Caddyfile. Caddy automatically reads its configuration from this file when it starts.
# ConfigMap for Caddyfile cluster.add_manifest( "CaddyConfig", { "apiVersion": "v1", "kind": "ConfigMap", "metadata": { "name": "caddy-config" }, "data": { "Caddyfile": """:80 { respond "Hello from Caddy v1"}""" } } )The next step is to run the application containers. In Kubernetes, this is done using a Deployment, which manages how pods are created, updated, and kept running.
In this example, the Deployment is responsible for:
Running the Caddy container image
Mounting the ConfigMap as a volume
Managing multiple replicas for availability
# Caddy Deployment cluster.add_manifest( "CaddyDeployment", { "apiVersion": "apps/v1", "kind": "Deployment", "metadata": { "name": "caddy" }, "spec": { "replicas": 2, "selector": { "matchLabels": { "app": "caddy" } }, "template": { "metadata": { "labels": { "app": "caddy" }, "annotations": { "configmap-reload-ts": str(int(time.time())) } }, "spec": { "containers": [ { "name": "caddy", "image": "caddy:2", "ports": [ { "containerPort": 80 } ], "volumeMounts": [ { "name": "caddy-config", "mountPath": "/etc/caddy" } ] } ], "volumes": [ { "name": "caddy-config", "configMap": { "name": "caddy-config" } } ] } } } } )Let’s do some break down:
replicas: 2: Runs two instances of the Caddy container, providing basic availability and allowing us to observe how Kubernetes distributes traffic.container image: Uses the official caddy:2 imagevolumeMounts and volumes: The ConfigMap created earlier is mounted into the container at/etc/caddy, which is where Caddy expects its configuration file by default.
At this point, the Caddy pods are running perfectly fine inside the cluster—buuut from the outside world, they might as well not exist. You can kubectl get pods all day long, but your browser still won’t load anything.
To make the application actually usable, we define a Service, which gives our pods a stable identity and a proper way to receive traffic.
In this example, we use a Service of type LoadBalancer, which is the simplest way to expose an application externally on AWS.
# Service to expose Caddy cluster.add_manifest( "CaddyService", { "apiVersion": "v1", "kind": "Service", "metadata": { "name": "caddy-service" }, "spec": { "type": "LoadBalancer", "selector": { "app": "caddy" }, "ports": [ { "port": 80, "targetPort": 80 } ] } } )Once the Service is created, Kubernetes and AWS work together to expose the application. After a short delay, the Service will receive an external IP or DNS name that can be used to access Caddy from a browser or via curl
Before we dive deeper, here is the full code for eks_stack.py
from aws_cdk import (Stack,aws_eks as eks,aws_ec2 as ec2,)
from aws_cdk.lambda_layer_kubectl_v32 import KubectlV32Layer
from aws_cdk import aws_iam as iam
from constructs import Construct
class CdkEksStack(Stack):
def __init__(self, scope: Construct, construct_id: str, **kwargs) -> None: super().__init__(scope, construct_id, **kwargs)
kubectl_layer = KubectlV32Layer(self, "KubectlLayer")
vpc = ec2.Vpc( self, "EksVpc", max_azs=2 # AZ )
self.cluster = eks.Cluster( self, "EksCluster", version=eks.KubernetesVersion.V1_32, vpc=vpc, default_capacity=0, kubectl_layer=kubectl_layer )
self.cluster.add_nodegroup_capacity( "ManagedNodeGroup", desired_size=2, min_size=1, max_size=3, instance_types=[ec2.InstanceType("t3.medium")], # 2vcpu/4gi )
self.cluster.aws_auth.add_user_mapping( iam.User.from_user_name( self, "AdminUser", "<YOUR_IAM>" ), groups=["system:masters"], )Also, the running_first_workloads_stack.py
from aws_cdk import (Stack,aws_eks as eks,)
from constructs import Construct
import time
class RunningFirstWorkloadsStack(Stack):
def __init__( self, scope: Construct, construct_id: str, cluster: eks.Cluster, **kwargs ) -> None: super().__init__(scope, construct_id, **kwargs)
class RunningFirstWorkloadsStack(Stack):
def __init__( self, scope: Construct, construct_id: str, cluster: eks.Cluster, **kwargs ) -> None: super().__init__(scope, construct_id, **kwargs)
# ConfigMap for Caddyfile cluster.add_manifest( "CaddyConfig", { "apiVersion": "v1", "kind": "ConfigMap", "metadata": { "name": "caddy-config" }, "data": { "Caddyfile": """:80 { respond "Hello from Caddy v2"}""" } } )
# Caddy Deployment cluster.add_manifest( "CaddyDeployment", { "apiVersion": "apps/v1", "kind": "Deployment", "metadata": { "name": "caddy" }, "spec": { "replicas": 2, "selector": { "matchLabels": { "app": "caddy" } }, "template": { "metadata": { "labels": { "app": "caddy" }, "annotations": { "configmap-reload-ts": str(int(time.time())) } }, "spec": { "containers": [ { "name": "caddy", "image": "caddy:2", "ports": [ { "containerPort": 80 } ], "volumeMounts": [ { "name": "caddy-config", "mountPath": "/etc/caddy" } ] } ], "volumes": [ { "name": "caddy-config", "configMap": { "name": "caddy-config" } } ] } } } } )
# Service to expose Caddy cluster.add_manifest( "CaddyService", { "apiVersion": "v1", "kind": "Service", "metadata": { "name": "caddy-service" }, "spec": { "type": "LoadBalancer", "selector": { "app": "caddy" }, "ports": [ { "port": 80, "targetPort": 80 } ] } } )And the last one, app.py:
#!/usr/bin/env python3import aws_cdk as cdk
from eks.eks_stack import CdkEksStackfrom workloads.running_first_workloads_stack import RunningFirstWorkloadsStack
app = cdk.App()
# 1. Create EKS cluster stackeks_stack = CdkEksStack( app, "EksStack",)
# 2. Deploy workloads on top of the clusterRunningFirstWorkloadsStack( app, "RunningFirstWorkloadsStack", cluster=eks_stack.cluster,)
app.synth()Before deploying, it’s often useful to see which stacks are defined in the application. You can list them using:
$ cdk list
Since the workload stack depends on the EKS stack, the simplest approach is to deploy all stacks at once:
$ cdk deploy --all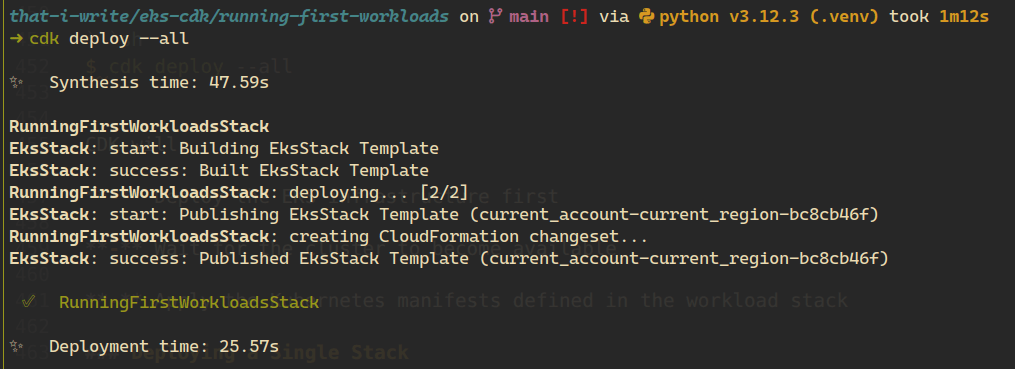
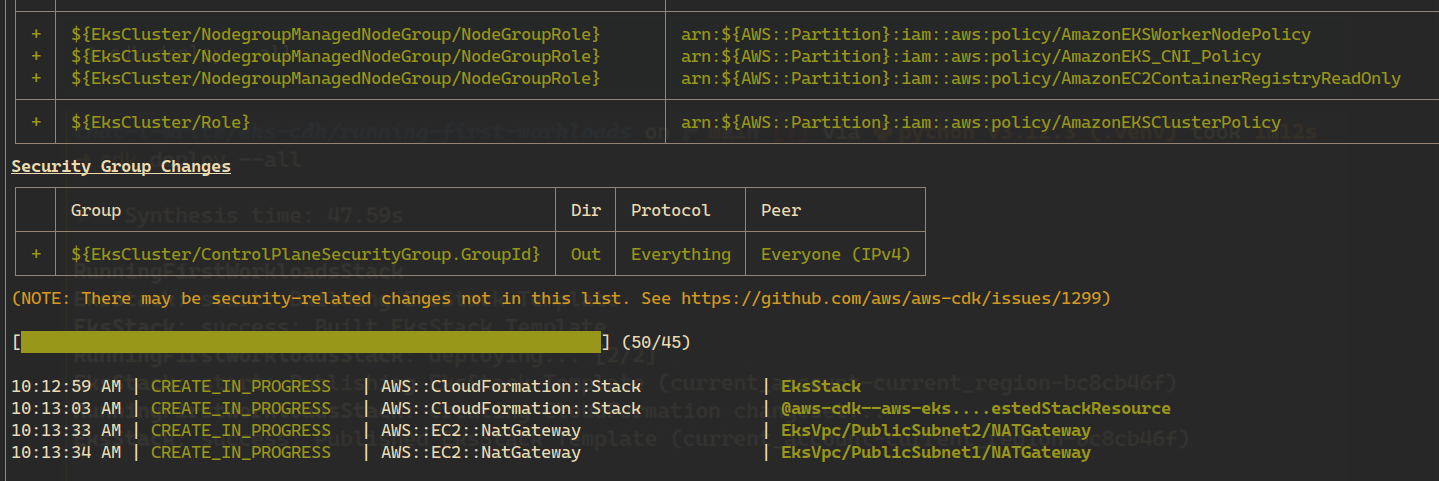
CDK will:
Deploy the EKS infrastructure first
Wait for the cluster to become available
Apply the Kubernetes manifests defined in the workload stack
Once the deployment is complete, let’s see that the workload is running correctly using Kubernetes commands.
First, let’s check the pods:
$ kubectl get pods
Both pods are in the Running state and ready, which means the Caddy containers started successfully and are using the configuration provided via the ConfigMap.
Next, let’s check the Service:
$ kubectl get svc
Here we can see that the caddy-service has been assigned an external endpoint by AWS. This means the load balancer is ready and traffic can now reach the application from outside the cluster.
Copy the value from the EXTERNAL-IP column and open it in your browser, or use curl:
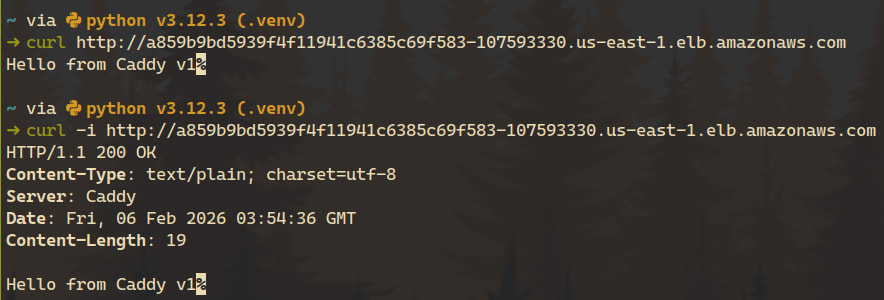
At this point, the workload is fully deployed and accessible.
To see how changes are applied, let’s update the Caddy configuration. We’ll modify the response in the Caddyfile from v1 to v2:
respond "Hello from Caddy v1" -> respond "Hello from Caddy v2"First, try deploying only the workload stack:
$ cdk deploy RunningFirstWorkloadsStackAt first glance, this looks like the correct approach—after all, only the workload code has changed. However, after the deployment completes, nothing appears to have changed:
The running pods are still the same
No rolling update is triggered
The application response still returns Hello from Caddy v1
In other words, from the cluster’s point of view, the workload has not been updated.
Although the ConfigMap content changed in code, Kubernetes manifests defined using cluster.add_manifest() are applied through a custom resource backed by the EKS stack. When deploying only the workload stack, CDK may determine that there are no CloudFormation-level changes that require reapplying the manifests.
As a result, the Kubernetes provider is not re-invoked, and the updated configuration is never applied to the cluster.
Next, we deploy all stacks together:
$ cdk deploy --allThis time, the behavior is different:
The EKS stack is re-evaluated
The Kubernetes provider is refreshed
The updated manifests are applied to the cluster
A rolling update is triggered on the Deployment
New pods are created with the updated configuration
After the rollout completes, the application now responds with:
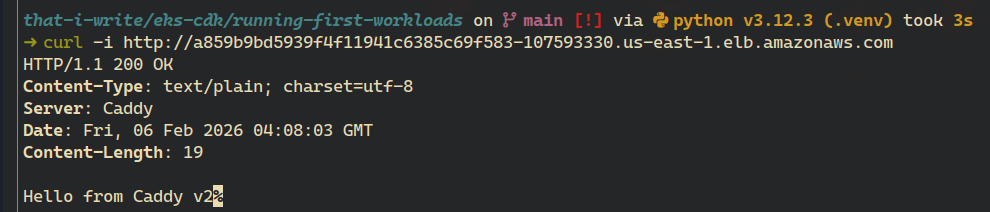
At this point, we’ve successfully deployed a workload to EKS using AWS CDK. We defined Kubernetes resources in code, deployed them through CDK, exposed the application externally, and verified that updates can be rolled out predictably.
This setup it’s still just the beginning.
In the next posts, we’ll continue building on top of this foundation by exploring more production-oriented patterns, including:
- CDK for more
- Ingress
- Autoscaling with Karpenter
Each of these topics will build directly on the cluster and workload we’ve created, moving the setup closer to a production-ready environment.
Aight, thanks for taking the time read this post, don’t forget to cleanup the stack. Here is the full code of this post: