Deploying a Simple Flask API Using Gunicorn, Supervisor & Nginx
Konten ini belum tersedia dalam bahasa Anda.
Intro
Hi there! Flask is great for building APIs quickly. But turning your local project into a publicly accessible web service involves a few extra steps that aren’t always obvious.
In this guide, I’ll show you how to deploy a Flask API using Gunicorn as the WSGI server, Supervisor to manage the process, and Nginx as a reverse proxy.
Overview
- Flask: The Python microframework we’ll use to build the API.
- Gunicorn: A Python WSGI HTTP server for running Flask in production.
- Supervisor: A process control system to ensure the Gunicorn server stays alive.
- Nginx: A reverse proxy to handle client requests and route them to Gunicorn.
Project Flow
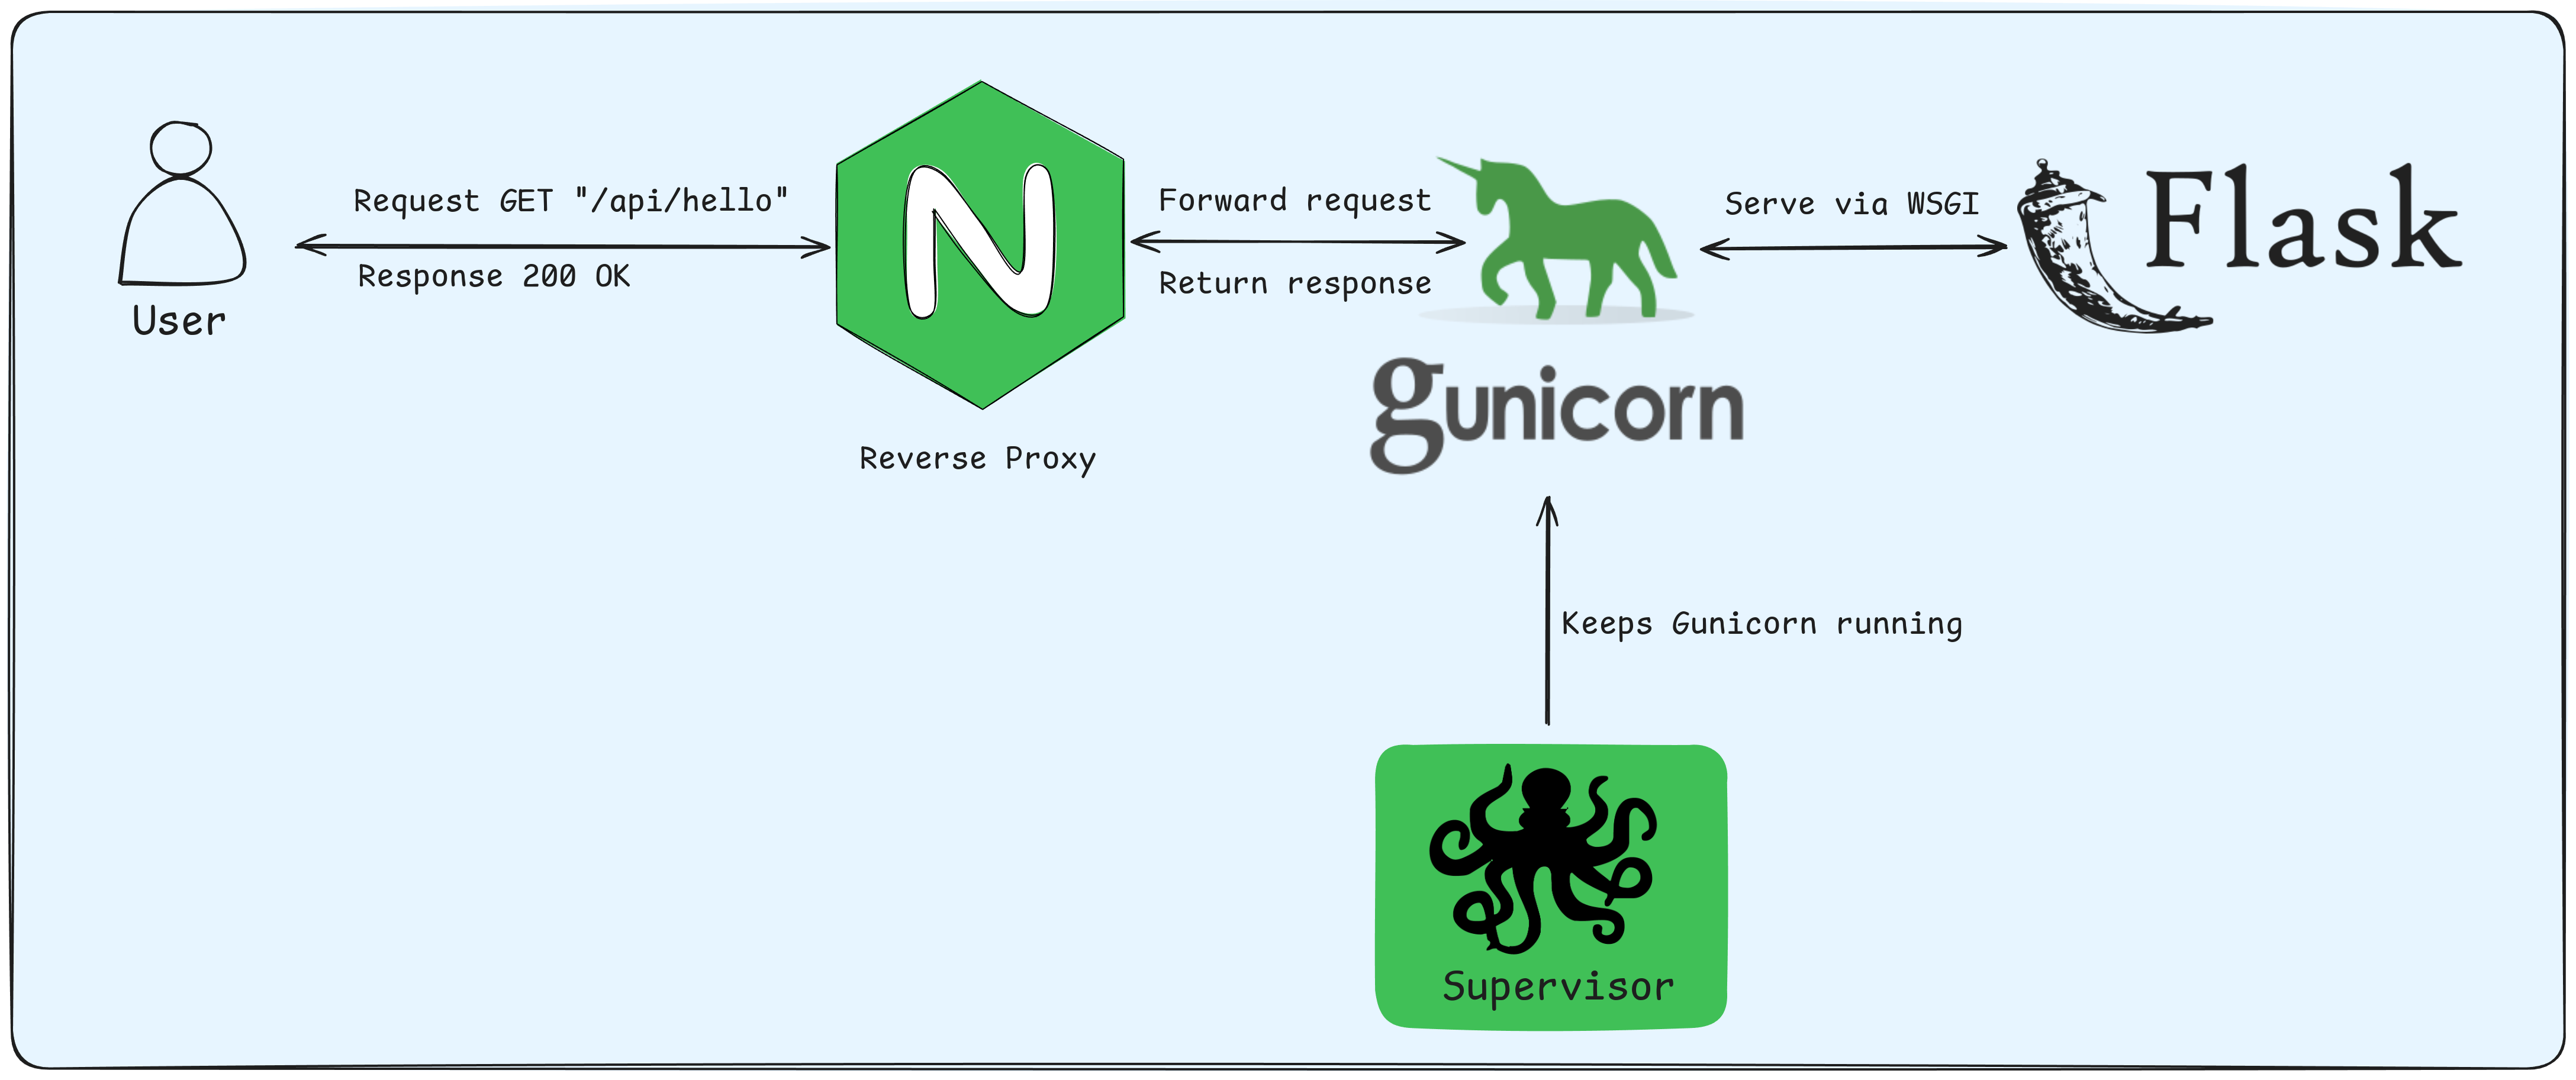
The diagram below illustrates the flow of a request and response when using Flask, Gunicorn, Supervisor, and Nginx.
When a user sends an HTTP request, it first reaches the Nginx reverse proxy. Nginx forwards the request to Gunicorn, which serves the Flask application via the WSGI protocol. Supervisor ensures that Gunicorn keeps running and automatically restarts it if needed. The response follows the same path back to the user.
Requirements
Before starting, make sure you have the following installed on your system:
- Python 3 and Virtualenv
Check if Python is installed:
$ python3 --version
Python 3.10.14
If not installed, install it:
Ubuntu/Debian:
$ sudo apt update$ sudo apt install python3 python3-venv -yCentOS/RHEL:
$ sudo yum install python3 python3-venv -yHomebrew (macOS):
$ brew install python- Nginx
Ubuntu/Debian:
$ sudo apt install nginx -yCentOS/RHEL:
$ sudo yum install nginx -yHomebrew (macOS):
$ brew install nginxAfter installation, check if Nginx is running:
$ sudo systemctl status nginxIf it’s not running, start and enable it:
$ sudo systemctl start nginx$ sudo systemctl enable nginx- Supervisor
Ubuntu/Debian:
$ sudo apt update$ sudo apt install supervisor -yCentOS/RHEL:
$ sudo yum install supervisor -yHomebrew (macOS):
$ brew install supervisorAfter installation, check if Supervisor is running:
$ sudo systemctl status supervisorIf it’s not running, start and enable it:
$ sudo systemctl start supervisor$ sudo systemctl enable supervisorSetting Up the Flask Project
First, create a project directory and set up a virtual environment:
$ mkdir flask-api && cd flask-api$ python3 -m venv venv$ source venv/bin/activateWith the virtual environment activated, install Flask and Gunicorn:
$ pip install flask gunicornYou can verify the installation:
$ flask --version$ gunicorn --versionNext, you need to create a file called app.py inside your project directory. You can use any text editor you prefer, such as nano, vim, or others:
$ vim app.py
from flask import Flask
app = Flask(__name__)
@app.route("/api/hello")def hello():    return {"message": "Hello from Flask API!"}
Then, try to run your Flask app using Gunicorn command:
$ gunicorn app:app
[2025-04-30 20:37:49 +0700] [1085004] [INFO] Starting gunicorn 23.0.0[2025-04-30 20:37:49 +0700] [1085004] [INFO] Listening at: http://127.0.0.1:8000 (1085004)[2025-04-30 20:37:49 +0700] [1085004] [INFO] Using worker: sync[2025-04-30 20:37:49 +0700] [1085005] [INFO] Booting worker with pid: 1085005[2025-04-30 20:38:58 +0700] [1085004] [INFO] Handling signal: winch
To try your app, just open another terminal session or window. You can use a tool like curl:
$ curl http://127.0.0.1:8000/api/hello
{"message":"Hello from Flask API!"}
Running with Multiple Workers
You can run Gunicorn with multiple worker processes using the -w option. For example, to run your app with 3 workers:
$ gunicorn -w 3 app:app
[2025-04-30 20:49:13 +0700] [1085759] [INFO] Starting gunicorn 23.0.0[2025-04-30 20:49:13 +0700] [1085759] [INFO] Listening at: http://127.0.0.1:8000 (1085759)[2025-04-30 20:49:13 +0700] [1085759] [INFO] Using worker: sync[2025-04-30 20:49:13 +0700] [1085760] [INFO] Booting worker with pid: 1085759[2025-04-30 20:49:13 +0700] [1085761] [INFO] Booting worker with pid: 1085760[2025-04-30 20:49:13 +0700] [1085762] [INFO] Booting worker with pid: 1085761
To confirm that Gunicorn is running with multiple workers, you can use tools like top or htop.
Install htop (optional but nicer to read):
$ sudo apt install htop -yThen run:
$ htop
To bind it to a different port (e.g., 8081) and listen on all interfaces:
$ gunicorn -b 0.0.0.0:8081 app:app
[2025-04-30 21:14:29 +0700] [1085847] [INFO] Starting gunicorn 23.0.0[2025-04-30 21:14:29 +0700] [1085847] [INFO] Listening at: http://0.0.0.0:8081 (1085847)[2025-04-30 21:14:29 +0700] [1085847] [INFO] Using worker: sync[2025-04-30 21:14:29 +0700] [1085848] [INFO] Booting worker with pid: 1085848
Adding Supervisor and Nginx Configuration
Supervisor Setup
To make sure Gunicorn runs in the background and restarts automatically if it crashes, you’ll want to use Supervisor. Here’s how to set it up:
Create a configuration file for your app:
$ sudo vim /etc/supervisor/conf.d/flask-api.confInsert this configuration (adjust paths as needed):
[program:flask-api]directory=/home/youruser/flask-apicommand=/home/youruser/flask-api/venv/bin/gunicorn -w 3 -b 127.0.0.1:8000 app:appautostart=trueautorestart=trueuser=www-datastdout_logfile=/var/log/flask-api.out.logstderr_logfile=/var/log/flask-api.err.logenvironment=PATH="/home/youruser/flask-api/venv/bin"directory=/home/youruser/flask-api → The working directory where your Flask project is located.
command=/home/youruser/flask-api/venv/bin/gunicorn -w 3 -b 127.0.0.1:8000 app
→ Runs the Gunicorn server with 3 workers, binding to localhost on port 8000.
autostart=true → Automatically starts the app when Supervisor starts (e.g., on boot).
autorestart=true → Restarts the app automatically if it crashes.
user=www-data → Runs the process as the www-data user (you can change this to your own user if needed).
stdout_logfile=/var/log/api/flask-api.out.log → File where standard output (including errors) is logged.
stderr_logfile=/var/log/api/flask-api.err.log → (Optional if using redirect_stderr) File for capturing standard error output.
environment=PATH=”…” → Ensures Supervisor uses the correct Python virtual environment for Gunicorn.
Then reload Supervisor to pick up the new config:
$ sudo supervisorctl reread$ sudo supervisorctl update$ sudo supervisorctl statusIf the API is not running, check the logs:
$ cat /var/log/flask-api.out.log$ cat /var/log/flask-api.err.logOr use Supervisor’s built-in log viewer:
$ tail -f flask-api
==> Press Ctrl-C to exit <==
Nginx Configuration
Now that Gunicorn is running your Flask app on port 8000, you’ll want Nginx to act as a reverse proxy.
Create a new Nginx config file:
$ sudo vim /etc/nginx/sites-available/flask-apiserver { listen 80; server_name _;
location / { proxy_pass http://127.0.0.1:8000; proxy_set_header Host $host; proxy_set_header X-Real-IP $remote_addr; proxy_set_header X-Forwarded-For $proxy_add_x_forwarded_for; proxy_set_header X-Forwarded-Proto $scheme; }}Enable the site and test:
$ sudo ln -s /etc/nginx/sites-available/flask-api /etc/nginx/sites-enabled$ sudo nginx -t$ sudo systemctl restart nginxFinally, ff everything is set up correctly, you should now be able to access your Flask API at http://YOUR_SERVER_IP/api/hello if you’re using a public server or VPS.
Optional: Project Structure & Requirements
To easily reinstall dependencies later:
$ pip freeze > requirements.txtHowever, it’s better to specify only the packages you need manually:
$ sudo vim requirements.txtflaskgunicornTo install all requirements, just run pip install:
$ pip install -r requirements.txtYour project structure should look like this:
flask-api/├── app.py├── venv/└── requirements.txtCommon Issues
Here are a few quick troubleshooting tips:
502 Bad Gateway: Usually means Gunicorn isn’t running or the Nginx config has the wrong port.
Supervisor status shows STOPPED: Check your config file paths and the logs:
sudo tail -f /var/log/flask-api.err.log
Permission errors: Ensure all paths used by Supervisor and Gunicorn are accessible by the appropriate user.
Conclusion
In this guide, we deployed a Flask API using Gunicorn as the WSGI server, Supervisor to keep the app running reliably, and Nginx as a reverse proxy to handle incoming requests. With this setup, your Flask app is ready to serve real traffic efficiently and automatically recover from crashes. Thanks for reading — and good luck with your deployment! 🚀
Project Reference: